Stardog OAuth 2.0 Configuration

Stardog can be configured to use third party OAuth 2.0 identity providers for authentication. In this post we will explain how this is done and how to configure your Stardog server to do it.
Architecture
Proving Identity — Authentication
When interacting with an Open Identify Connect service or an OAuth 2.0 indentity provider like Google the concept of a JSON Web Token (JWT) is at the center of the system. Glossing over some details that will be discussed later, a user known to Google can contact Google and effectively ask for a JWT to prove their identity to a third party. Google will form a blob of information known as a JWT and return in it to the user. In that blob are two key pieces of information:
- The user’s identity, e.g. an email address and/or account number.
- A cryptographic signature of the JWT itself.
This is created by using a private key, known only to Google, and using it to sign the data in the JWT. The signature is then distributed with the JWT as a field in it. That JWT can now be given to a third party service provider, in our case the Stardog server. That service provider can use Google’s published public keys to verify the signature. If the signature checks out the third party service can rest assured that Google believes the user in question is who the JWT says they are. In this way Google is the identity provider and handles authentication for the Stardog server. Now authorization becomes the job of the Stardog server.
Authorization
Now that the Stardog server believes a user’s client is who they say they are it is up to the Stardog server itself to decide what that user can do. This is known as authorization. In the Stardog server this is done in a very straight forward way. Simply name your Stardog users after their ID in the JWT. As an example if you are choosing the email address as the users identify simply create a Stardog user named after that email address, e.g. john@stardog.com and then use the standard Stardog RBAC mechanisms to control what that user can do.
Configuration
The Easy Part
The good news is that configuring Stardog to use JWTs from identity providers like Google is a simple means of editing a couple of files. We will go through examples here that use Google.
The first thing that needs to be done is to enable the Stardog server to use the OAuth 2.0 authentication mechanism. To do this edit the stardog.properties file and add the following lines:
security.realms=stardog,api-token-realm
jwt.conf=/var/opt/stardog/jwt.yaml
The first line tells Stardog to enable both the standard Stardog authentication realm and the api-token-realm which is the one that handles OAuth 2.0 authentication.
The second line points to a file where the details of this servers OAuth 2.0 configuration are specified. An example that tells the Stardog to accept Google as an identity provider is below:
---
confVersion: "1.0"
deploymentName: stardog-server
issuers:
  https://accounts.google.com:
    usernameField: email
    algorithms:
      RS256:
        keyUrl: https://www.googleapis.com/oauth2/v3/certs
The most important part of the above configuration file is the entry under issuers. When a JWT is presented to a Stardog server the issuer field is checked against the entries in the issuer map. If a match is not found authentication is rejected. If it is found the algorithms section is used to validate the signature in the JWT. In the case of Google a RSA256 asymmetric key is algorithm is used and the public key we need can be fetched from the keyUrl field location https://www.googleapis.com/oauth2/v3/certs. If the signature checks out and the expiration date in the JWT has not yet be reached then Stardog accepts this client as authenticated to be who Google says it is.
Now the task is to decide if the user is authorized to use this Stardog server. To do so the usernameField, in this case email will be pulled out of the JWT and considered the Stardog user name candidate. If that username is known to the Stardog server the client will be authorized to used that Stardog server and given whatever RBAC rights are configured for that username.
The above configuration will make your Stardog server accept valid JWTs as access bearer tokens. Because of this you can run something like this:
$  export BEARER_TOKEN=<a valid good JWT>
$  curl -H "Authorization: bearer ${BEARER_TOKEN}" https://express
dog.cloud:5820/admin/users
{"users":["john@stardog.com"]}
This shows us using a JWT as a bearer token and achieving access to the Stardog server but it begs the question: How do I get that token? Or even more importantly how do I provide a way for my Stardog users to get these tokens? This brings us to the hard part.
The Hard Part
In order to effectively use any third part service with Stardog an interactive login application will be required in order to direct the user to Google to properly authenticate and authorize the creation of the needed JWT. The good news is that this is a very well documented process and can even be done in a single webpage by largely copying and pasting some Javascript as defined here.
Here we will explain how to setup Google OAuth 2.0 for your users at a very high level. This should in no way be considered a canonical guide and such code should be audited by security professionals.
Interaction Pattern
This is a quick overview of how OAuth 2.0 works is terse detail. Greater detail can be found here.
- A user visits your web page and requests “Login With Google”.
- The user is redirected to to Google with public information about your application.
- Google presents the user with a form asking them if they would like to give your application access to their identity.
- If the user agrees they are redirected back to your application. That redirect comes with a short lived access token.
- Your application uses that access token known as an authorization code.
- Your application uses the authorization code to get a JWT from Google.
- Your application code presents this JWT to the user in a secure way for later use with Stardog.
Web Addressable Login Application
The first thing you are going to need to achieve the above workflow is an application on the internet that Google can address and is at a known static domain name being served with HTTPS. This is needed for two reasons:
- When the user wishes to ask Google for a JWT (step 6 above) it must do it from Javascript that came from a known and authorized source origin. This source origin is statically configured when you as the Stardog administrator ask Google for a new application.
- Once the user has authorized Google to create a JWT for authentication with your Stardog server Google will redirect them back to a URL. (Step 5 above).
This application can be created in any number of ways and hosted on any number of platforms. Google has documentation to help you write such applications in a variety of languages here.
Google Web Application
In order to use your web login application you will need a client id and client secret which are used to access the Google APIs. To acquire these you must create a account with Google and configure an OAuth 2.0 Web Application. The details of this are described here but we will give a quick over view.
- Create a OAuth 2.0 credentials in your Google account. Go to the credentials page and click on “Create Credentials” → “OAuth Client ID”. Select the application type “Web Application”.
- Configure your web application by giving it a name and adding the source origin of your Javascript application as well as the URL return ID.
- Record the Client ID and Client Secret for use with your login web application described above.
When creating the login web application you also need to know the identity scope that your application will require. For Stardog’s needs this can be openid email.
Summary
OpenID and OAuth 2.0 are very convenient ways allow your users to authenticate with your Stardog server. While configuring the Stardog server to use a third party provider like Google is easy care is needed when configure the identify provider itself and creating the fronting web application to interact with it. However the good news is that this a well documented and well known process.
Look forward to better client side support for OAuth 2.0 login in future releases of the Stardog Platform.
Keep Reading:
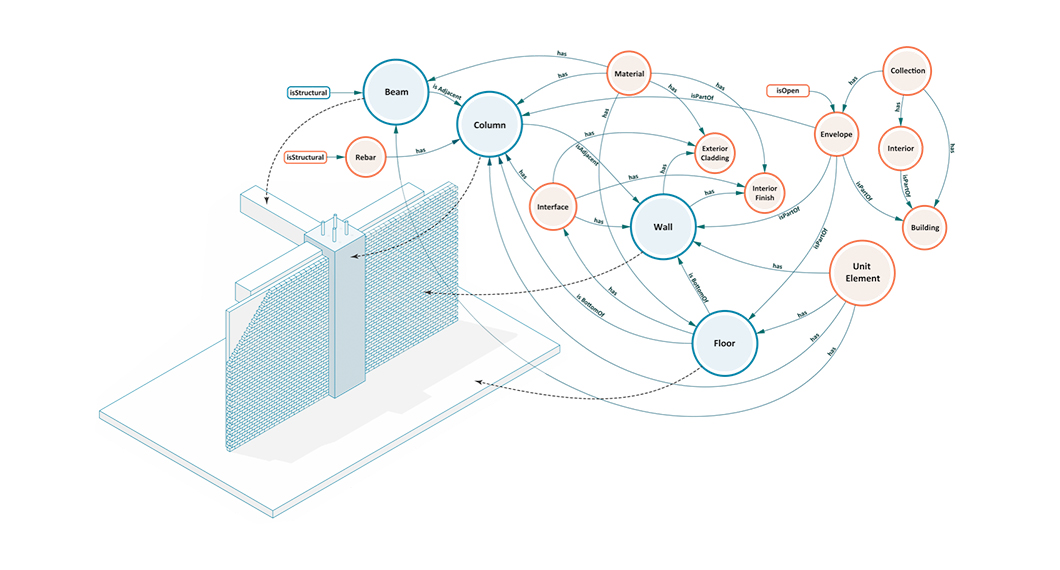
Buildings, Systems and Data
Designing a building or a city block is a process that involves many different players representing different professions working in concert to produce a design that is ultimately realized. This coalition of professions, widely referred to as AECO (Architecture, Engineering, Construction and Operation) or AEC industry, is a diverse industry with each element of the process representing a different means of approaching, understanding, and addressing the problem of building design.
Graph analytics with Spark
Stardog Spark connector, coming out of beta with 7.8.0 release of Stardog, exposes data stored in Stardog as a Spark Dataframe and provides means to run standard graph algorithms from GraphFrames library. The beta version was sufficient for POC examples, but when confronted with real world datasets, its performance turned out not quite up to our standards for a GA release. It quickly became obvious that the connector was not fully utilizing the distributed nature of Spark.
Try Stardog Free
Stardog is available for free for your academic and research projects! Get started today.
Download now